Tire Basics
Tire Terminology
Tire Terms
Tires are what connect the wheel to the road, thus putting the car in motion and giving it traction. Without these simple pieces of rubber, cars would barely be able to move and certainly not in the intended direction. However simple they may seem, tires are made up of many parts. The following breakdown will walk you through the major components of the tire’s structure, their location, and their purposes for both passenger car tires, truck tires, and for SUV tires.
Tire Anatomy and Construction
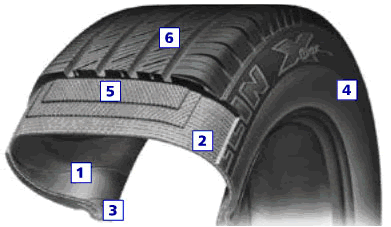
- Airtight Synthetic Rubber Liner
Most modern tubeless tires are constructed with a virtually impermeable butyl rubber liner. This liner replaces the old inner tubes. Check your tire's air pressure monthly, as some air loss occurs over time.
- Carcass Ply
The carcass ply is comprised of thin textile fiber cables that are bonded into the rubber. These fiber cables are largely responsible for determining the strength of the tire.
- Beads
The beads are responsible for clamping the tire firmly against the rim of the wheel.
- Sidewall
In addition to giving the tire its height, the sidewall protects the tire against impacts with curbs and other objects. The sidewall also contains all the markings which tell you the important information about the tire, such as speed rating, load rating, and tire dimensions.
- Crown Plies
Crown plies provide the rigid base for the tread which allows for good gas mileage. The plies also provide centrifugal and lateral rigidity to the tire, while also allowing the tire to flex sufficiently for a comfortable ride.
- Tread
The tread is designed to provide traction in a variety of conditions. Good tread design also resists wear, abrasion, and heat.
On the sidewall, you can find branding that identifies the materials and number of layers of each of the different types of materials used to construct the tire. For example, a typical tire might have the following basic construction material listed: TREAD 2 POLYESTER + 2 STEEL + 1 NYLON SIDEWALL 2 POLYESTER
In the example above, the "TREAD 2 POLYESTER" indicates that there are two radial body plies of polyester cord molded into the rubber under the centerline of the tread. In addition, the "2 STEEL + 1 NYLON" indicates that there are two belts of angled steel cord and one ply of circumferential cap nylon cord. The "SIDEWALL 2 POLYESTER" indicates that the tire has two radial body plies of polyester cord in each sidewall at the widest points of the tire's section width. (The section width is the distance between the tire's inner and outer sidewalls). The two polyester sidewall plies are a continuation of the same two polyester body plies under the tread's centerline.
Many high-speed tires are constructed with additional reinforcements above the steel belts. Typically, these circumferential reinforcements can take the form of full cap plies and/or belt edge strips. Full cap plies are additional plies that cover the entire width of the steel belts. Belt edge strips are bands (approximately 1 inch wide) that cover only the inner and outer edges of the steel belts. Belt edge strips will not be listed in the material's branding for the tread area because they do not reside under the centerline of the tread, but at the inner and outer edges of the steel bands.
Similar to high-performance tires, many ultra-high performance tires are constructed with additional reinforcement to their sidewalls. Typically, fabric or steel cord is used in the sidewall construction to increase cornering stability and steering response. Just as the belt edge strips are not listed in the material's branding for the tread area because they do not reside under the centerline of the tread, sidewall reinforcing material is not generally listed in the material's branding for the sidewall area because the material is not present at the widest points of the tire's sidewall.
Tire Size and Measurements
How to Read a Tire's Sidewall
Practically everything you need to know about a tire can be found on its sidewall.
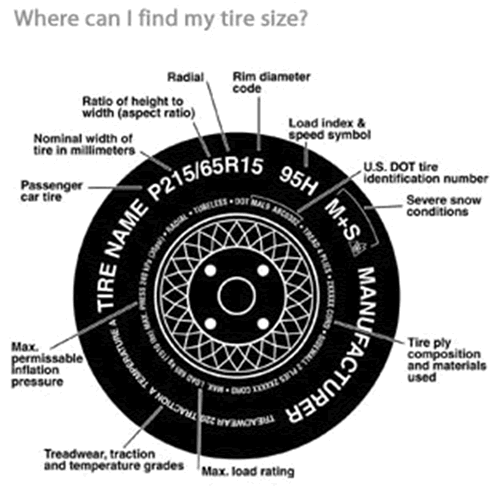
Tire Sizing and Measurements
How to interoperate the size of the tire.
For example: P225/50R17 89W
P = Passenger Car Tire
225 = Section Width in Millimeters
50 = Aspect Ratio
R = Radial Construction
17 = Rim Diameter in Inches
89 = Load index
W = speed rating
Tire Load Index
The load index for any tire indicated the maximum weight that each tire is able to sustain.
As you can see in the following table, the higher the tire's Load Rating, the greater the load it can carry.
Load Index |
Pounds (lbs) |
Kilograms |
Load Index |
Pounds (lbs) |
Kilograms |
71 |
761 |
345 |
91 |
1356 |
615 |
72 |
783 |
355 |
92 |
1389 |
630 |
73 |
805 |
265 |
93 |
1433 |
650 |
74 |
827 |
375 |
94 |
1477 |
670 |
75 |
853 |
387 |
95 |
1521 |
690 |
76 |
882 |
400 |
96 |
1565 |
710 |
77 |
908 |
412 |
97 |
1609 |
730 |
78 |
937 |
425 |
98 |
1653 |
750 |
79 |
963 |
437 |
99 |
1709 |
775 |
80 |
992 |
450 |
100 |
1764 |
800 |
81 |
1019 |
462 |
101 |
1819 |
825 |
82 |
1047 |
475 |
102 |
1874 |
850 |
83 |
1074 |
487 |
103 |
1929 |
875 |
84 |
1102 |
500 |
104 |
1984 |
900 |
85 |
1135 |
515 |
105 |
2039 |
925 |
86 |
1168 |
530 |
106 |
2094 |
950 |
87 |
1201 |
545 |
107 |
2149 |
975 |
88 |
1235 |
560 |
108 |
2205 |
1000 |
89 |
1279 |
580 |
109 |
2271 |
1030 |
90 |
1323 |
600 |
110 |
2337 |
1060 |
Tire Speed Ratings
Speed rating is a letter which indicates the maximum speed capability of a tire. In Europe, speed ratings were originally developed to help owners of high performance sports cars choose replacement tires designed to match the speed capabilities of their vehicles. The speed rating of any tire is a measurement of the top safe speed the tire can carry a load under specified conditions. It is also a suggestion of how the tire will handle at lesser speeds. A higher rated tire will give you better traction and improved steering response.
Speed rating is a letter which indicates the maximum speed capability of a tire. In Europe, speed ratings were originally developed to help owners of high performance sports cars choose replacement tires designed to match the speed capabilities of their vehicles. The speed rating of any tire is a measurement of the top safe speed the tire can carry a load under specified conditions. It is also a suggestion of how the tire will handle at lesser speeds. A higher rated tire will give you better traction and improved steering response.
Below is a listing of common speed ratings:
Speed Rating |
Miles/Hour |
Km/Hour |
Application |
M |
81 mph |
130 km/h |
|
N |
87 mph |
140 km/h |
Temporary Spare Tires |
P |
93 mph |
150 km/h |
|
Q |
99 mph |
160 km/h |
Studless and Studded Winter Tires |
R |
106 mph |
170 km/h |
Heavy Duty Light Truck Tires |
S |
112 mph |
180 km/h |
Family Sedans & Vans |
T |
118 mph |
190 km/h |
Family Sedans & Vans |
U |
124 mph |
200 km/h |
|
H |
130 mph |
210 km/h |
Sport Sedans & Coupes |
V |
149 mph |
240 km/h |
Sport Sedans, Coupes & Sports Cars |
W |
168 mph |
270 km/h |
Exotic Sports Cars |
Y |
186 mph |
300 km/h |
Exotic Sports Cars |
Z |
149+ mph |
240+ km/h |
Sports Cars |
All-Season Tires vs. Winter Tires
Each winter, people often find themselves wondering "Are my all-season tires okay for winter weather?" That can be a tough question to answer. In case you're asking that very question, here's some information to help facilitate your decision about whether or not to buy winter tires.
How are all-season and winter tires different?
All-Season (aka all-weather) tires are designed to be reliable in many different weather circumstances (ex. rain, dry, etc.), but they do not focus on one particular condition. On the other hand, winter tires were created specifically to have the best possible performance in winter weather conditions.
Are all-season and winter tires made with the same materials?
For the most part yes, however there is one very important difference- their rubber compounds. Winter tires are made with a special rubber compound that can handle low temperatures and allow the tire to conform to the road, therefore keeping traction and grip on icy and snow-covered roads. All-season tires have various technologies that allow them to perform well in various conditions. The rubber compound used in winter tires is unfortunately not one, so during the winter all-season tires will harden, creating less traction and grip between your tires and the pavement.
So why aren't all tires made with the rubber compound found in winter tires?
All-Season and summer tires use a different rubber compound because the softer rubber used in winter tires tends to wear down more quickly. Though they are perfect for winter weather, year-round winter tire use will end up costing you more.
What do all-season and winter tires look like?
All-Season tires are marked with a "M+S" meaning "mud and snow". Winter tires have a mountain and snowflake symbol on the sidewall that means they meet the standards of the Rubber Manufacturers Association for use in severe snow conditions.
So is it okay to use all-season tires during the winter?
It is okay IF you live in a region with little snow or ice and moderate temperatures, like in the Southern US. However, if the temperatures where you live are typically below 44 °F during the winter, then you should invest in winter tires.
Tire Pressure
The best possible tire performance requires accurate tire inflation. Tire pressure can vary over time due to factors such as climate, regular air loss, and how you drive your vehicle. To maintain proper inflation, you should check your tires periodically. Under inflation and over inflation of tires can lead to early or uneven wear, traction problems, and tire failure.
The best place to find the proper tire pressure for your tire is in your owner’s manual. Never inflate your tires to the maximum PSI it can cause serious damage. Remember to check your tire pressure monthly.
Tire Pressure Monitoring Systems (TPMS)
WHAT DOES TPMS MEAN FOR YOU
A tire pressure monitoring system can help you maintain proper inflation of your tires. The bulk of accidents resulting from tire failure have cited the under inflation of tires as the root of the problem. The obvious course of action is to be sure that your tires are well inflated by checking the tire pressure. It is recommended that you gauge your tire’s pressure every couple of weeks. It is difficult to gauge your tires just by visual appearance, and it is even more difficult to do so when you own low-profile tires with extra stiff sidewalls. By the time you can visually see that they are low, you could already be as much as 15 psi under.
One way to alleviate this tedious yet necessary task is to have a tire pressure monitoring system. Should your tires fall below acceptable pressure, your TPMS will alert you with a warning that you should pull over and inflate your tires. The TPMS has sensors that are mounted in the drop center inside of the wheel, or on the end of the valve stem as an antenna. Sensors that are attached to the rim drop center are usually held in place by a long steel strap that wraps all the way around the circumference of the wheel. The sensors themselves are very accurate, usually with an error of 2 psi over or under.
HOW TO GET A TPMS SYSTEM TRANSFERRED
First off, be sure that you take your car to a shop you trust. When the shop starts the process, they will do so by pulling down each of the stock tires individually at the area closest to the valve stem. They will not have to remove the entire tire; they only need the space to remove the sensor and the valve stem. With those things removed, they will insert a stock valve stem so you can continue to use your stock tires if needed. Then, using a fairly basic band and mounting system, each of the sensors are siliconed into custom-made brackets. Each one of the brackets will hold a sensor in place and has an accepting slot that will be used with the metal band. That band is then wrapped around the wheel and then tightened so that it is perpendicular to the valve system.
From there the tires are mounted, balanced, and inflated to the recommended specifications. The vehicles computer system is then reset to accept the new readings. This step requires the shop to have vehicle specific expertise, since different cars have different computer systems when dealing with a TPMS. The vehicle is then taken on a test drive to ensure that the readings are accurate and that no warning lights come on.
IMPORTANT NOTES ON TPMS
The TPMS is powered by a small lithium battery that will last anywhere from 5 to 10 years. But eventually it will need to be replaced.
Also, rotating your tires will change the location of your sensors, so be sure to reset the computer every time you rotate your tires. Consult your user’s manual on how to perform such an action.
Uniform Tire Quality Grading System: Treadwear, Traction and Temperature
Uniform Tire Quality Grading System
The Uniform Tire Quality Grading System (UTQGS) is a tire information system that provides buyers with information on three categories:
- Treadwear
- Traction
- Temperature
Each tire manufacturer performs its own tests in these areas, following government prescribed test procedures. Each manufacturer then assigns grades that are branded on the tire. This is known as the Uniform Tire Quality Grade Labeling (UTQGL).
Treadwear
Treadwear grades typically range from 60 to over 500, in twenty point increments. It is important to remember that the actual life of any tire is determined by the road surface quality, driving habits, inflation, wheel alignment and the rotation it experiences. To receive a treadwear grade, a tire is tested under controlled conditions on a government prescribed test course which does not necessarily simulate the actual application for which a given tire is designed to perform. As a result of these test parameters, there is no reliable way to assign miles of wear to treadwear grade points.
Treadwear ratings are determined on a 400 mile government test course covering specified sections of public roads near San Angelo, Texas. A group of up to four test vehicles travel the course in a convoy so that all tires experience the same conditions. Tread groove depths of the tires being tested are measured in 800 mile incriminates. The same procedure is followed for a set of control or "course monitoring tires". Upon completion of the 7200 mile test, the rating results of both tests are compared, and the tires being tested are assigned a treadwear rating by the tire manufacturer.
The best way to use treadwear ratings when selling tires is to compare one rating to another. For instance, a tire with a treadwear grade of 400 might be expected to last twice as long as a tire that has a grade of 200.
Traction
Traction grades measure the tire's ability to stop a car in straight-ahead motion on a wet test surface pavement. It does not measure straight-ahead acceleration. It is important to remember that traction rating tests are performed only for straight-ahead sliding on concrete and asphalt surfaces that have a specified degree of wetting which simulates most road surfaces in a rainstorm. The ratings that result from these tests may not apply to cornering traction or peak values of straight-ahead braking those experienced in non-skid braking tests. Traction grades range from "A" to "C", with "A" being the highest attainable grade.
Traction ratings are established on government maintained skid pads. Twenty measurements are taken with an industry standard control tire, on an asphalt surface, and then they are averaged. The same numbers of measurements are made on a concrete surface. Corresponding measurements are then made on the tires being tested. Once the results of the tests are compared, traction ratings based on government prescribed coefficient levels are assigned to the tires that were tested.
Temperature
Temperature grades also range from "A" to "C", with A being the highest. Temperature grades represent a properly maintained tire's ability to dissipate heat under controlled indoor test wheel conditions.
Temperature ratings are determined by running tires on an indoor road wheel test under specified conditions. Successive 30 minute runs are made in 5 mph increments starting at 75 mph and continuing until the tire fails. A tire is graded from “A” to "C", with “A” being the highest.
Noise and Vibration Problems
Some of the most common causes of noise and vibration problems are:
- Tire and wheel out of balance
- No hub centric rings on aftermarket wheels
- Incorrect hardware for aftermarket wheels
- Irregular tire wear
- Rim is damaged
- Tire is damaged
There could be other causes of noise and vibration then those listed above. It is important not ignore pulling or vibration. If you have this problem have a professional inspect the issue.
Top 10 reasons for bad vibes
Here are the top 10 reasons for vibration-related customer comebacks:
- 60% Improper wheel mounting on the balancer or clamping error
- 10% Wheel balancer out of calibration
- 7% Improper wheel weight application
- 6% Eccentricity problem
- 4% Improper wheel fastener torque
- 3% Used wheel weights
- 2% Bent wheel rim
- .5% Radial force variation, lateral force, conicity and ply separation
- .5% Bent wheel center disc
Mounting and Balancing
Ready Wheels provides customers with Free Mounting and Balancing on all orders using the latest technology available for mounting and balancing your wheel and tire package. The machinery used is top of the line. We use Hunter's TC3500 tire changer to insure proper mounting. We also apply the Road Force test and balance your wheels with Hunter's GSP9700 which measures radial and lateral tire forces.
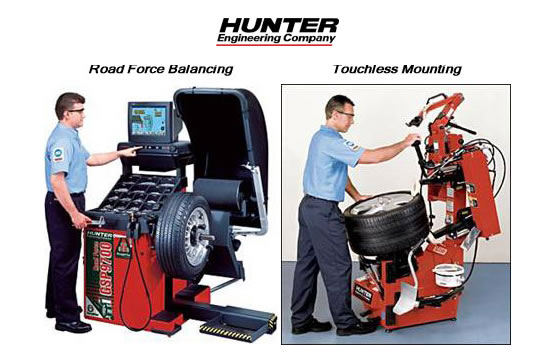
Mounting and Balancing Your Tires and Wheels
Mounting the tires involves placing the tires onto the wheels / rims and then installing them onto the axles of the vehicle.
When mounting tires and wheels, you should always follow several guidelines. First, mounting and balancing should only be performed by a trained professional using specialized equipment. Second, both tire beads need to be properly seated and securely mounted on the wheel. The wheel must not be damaged or bent. When mounting the wheel to the hub of the axle, the hub should be free of dirt or debris that might cause the wheel to be seated unevenly on the hub. The wheel should be evenly seated with all the lug nuts properly torqued onto the bolts.
Balancing the tires and wheels is the procedure of analyzing the tires and wheels to see if there are any heavy spots that would cause them to vibrate when spinning. Technically speaking, the center of gravity is defined as the point around which the entire mass is evenly distributed. The wheel is said to be in balance when the center of gravity is identical to the axis of rotation. In non-technical terms, it simply means that when the tire and wheel are mounted to the hub of the axle, all the mass is evenly distributed around the axle so that there is no vibration when the tire spins. In a way, it's similar to how your washing machine vibrates during the spin cycle if the clothes are not evenly distributed inside the washer.
To balance the tires and wheels, the technician utilizes a special machine. One at a time, the tire and wheel assemblies are placed on the machine and run through a series of spinning diagnostics. The machine will identify where the tire and wheel assembly is out of balance. The technician can correct the imbalance(s) by applying small weights to the rim at specific locations in order to even out the weight distribution.
If your tire(s) are out of balance, the quality of your ride may be adversely affected. Most drivers and vehicles are sensitive to vibrations while driving. Even minor vibrations can be annoying to many people. On top of that, when your tires are out of balance, not only can their life be shortened, but also the life of wheel bearings, shocks, and other suspension components can be affected due to the repetitive vibrational forces.
Sometimes vibrations become more apparent at certain speeds. Usually, if the vibration is caused by a weight imbalance, you will probably begin to notice it around 40-45 mph, and it may increase as your speed increases.
On the other hand, sometimes vibrations can occur if the wheel and/or tire are not completely round. If there happens to be a high spot on the wheel and also a high spot on the tire, and they both happen to be lined up with each other, then the high spot will be even more pronounced. If this is the case, the tires will experience "runout" or "hopping". If you have had the tire and wheel professionally balanced and you suspect that the continued hopping vibration is due to a wheel that is out-of-round, you can try to adjust the position of the tire on the wheel to see if that fixes the problem. Have the technician de-inflate the tire to loosen it from the wheel, lubricate the beads and then move the tire's seated position by 180 degrees so that the high spot on the tire is opposite the high spot on the wheel (like going from 12:00 to 6:00 on the dial of a clock). After re-inflating the tire and re-mounting, if the problem persists, you can try the process again by rotating the tire 90 degrees in either direction from the current position (like going to 3:00 or 9:00 on the dial of a clock). This way, if there is a high spot on the tire, you will have tried to position it at four different positions on the wheel in 90 degree increments. At this point, if the vibration problem still persists, then there is either a problem with the tire, the wheel, or the vehicle itself.
A note of caution!
Remember, tires are under pressure when inflated. Serious injury or death may result if the tire and/or rim assembly should explode due to improper mounting. Only specially-trained technicians should mount tires on rims/wheels and the tires must be the correct diameter and dimensions for the wheels.
Tire Maintenance
Tire Rotation
Since tires act as a car’s connection to the ground, they are bound to wear over time. However, different positions on the car in which tires are located, such as front right, front left, back right, and back left, wear the tires differently. In order to improve the longevity of your tires as well as keep them in optimum handling condition, the tires need to be rotated approximately every 5,000 to 7,000 miles.
Tire Rotation Patterns
Choosing the correct rotation pattern for your tires depends on several factors:
- If your tires are "directiona" or "non-directional"
- If your vehicle is Front-Wheel-Drive (FWD) or Rear-Wheel-Drive (RWD)
- If your vehicle is Four-Wheel-Drive (4WD) or All-Wheel-Drive (AWD)
- If you have a full-size spare tire or a mini-spare
- If you have staggered fitment tires (different sizes and/or offsets on front and rear)
Non-Directional Tires, Same Size & Offset on Front & Rear
The Tire & Rim Association has identified three main rotation patterns that can be used for most vehicles in this scenario.
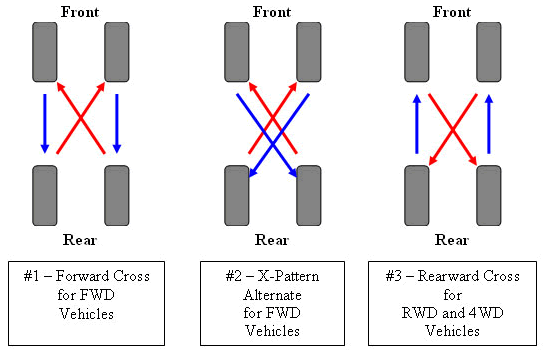
#1-Forward Cross
Use this pattern if your vehicle is a FWD vehicle. Move the front tires straight back to the rear, and bring the rear tires to the opposite side of the front axle.
#2- X-Pattern
If your vehicle is a FWD vehicle, you can use this as alternate pattern instead of the #1 Forward Cross. Move the front tires to the opposite rear positions and move the rear tires to the opposite front positions.
#3- Rearward Cross
Use this pattern if your vehicle is a RWD or 4WD vehicle. Move the rear tires straight up to the front and move the front tires to the opposite rear positions.
Directional and/or Staggered High-Performance Tires & Wheels
In addition to the three main rotation patterns listed above, there are two additional patterns that can be used for today's high-performance tire and wheel trends.
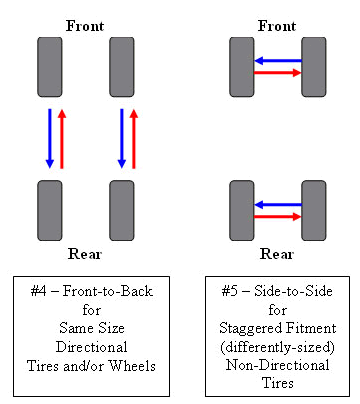
#4-Front-to-Back
Directional tires are designed and constructed so that they always rotate in the same direction due to their tread pattern. If your tires are directional, they should only be rotated from front-to-back (or vice-versa) on the same side of the vehicle. If you have the same size and offset directional tires, use Pattern #4. Move the front tires to the rear on the same side and the rear tires to the front axle on the same side of the vehicle.
#5- Side-to-Side
If you have differently-sized non-directional tires on the front and rear axles, use the side-to-side Pattern #5. Move the front tires to the opposite side of the front axle and the rear tires to the opposite rear side. If you have differently-sized directional tires on the front and rear, you cannot use Pattern #5 as shown. Instead, you will need to dismount the tires from the wheels, and remount and balance the tires on the opposite wheels.
Five Tire Rotation - Full Size Spare Tire
If your vehicle is equipped with a temporary or "mini-spare" tire, it cannot be included in your tire rotation practice. However, if your vehicle is equipped with a full size, non-directional spare tire (not branded "for temporary use") and wheel the same size as your four main tires & wheels, you may want to consider the following rotation patterns to keep all five tires evenly worn. This is especially important for 4WD and AWD vehicles, because if you need to use your spare tire and it has different wear than your other three tires, it could place undue forces on the drive train of your vehicle due to the difference in tread depth.
First, check your vehicle's owner's manual to see if they have a recommended tire rotation pattern and follow those guidelines. If there is no rotation information available, consider the following patterns:
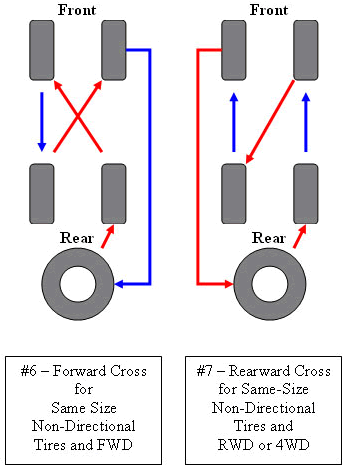
#6-Forward Cross for Front-Wheel-Drive
If your vehicle is FWD and you have non-directional tires with a full-size matching spare, use Pattern #6. Move the rear tires to the opposite front positions. Move the left front tire to the left rear position. Move the spare tire to the right rear position and let the right front tire become the spare.
#7- Rearward Cross for Rear-Wheel-Drive or 4-Wheel-Drive
If your vehicle is RWD or 4WD with non-directional tires and a full-size matching spare, use Pattern #7. Move the left rear tire to the left front position. Move the right rear tire to the right front position. Move the right front tire to the left rear position. Move the spare tire to the right rear position and let the left front tire become the spare.
TIRE INFLATION
Although it may not seem to make a difference how much air is put into a tire as long as it is full and the car moves, it truly does affect many aspects of driving. Tires can be both under-inflated and over-inflated, both of which can be detrimental for proper driving.
If the tires are under-inflated, there is much more contact with the ground which slows down the car, weakens the quick responsive handling, and has limited durability and life.
On the other hand, with over-inflated tires, the contact patch is smaller and thus there is less traction as well as over-inflation weakens the structural integrity of the tire as well. It is important to always make sure that your tires are at the proper pressure and are maintained and check regularly.

Using Mismatched or Mixed Sets of Tires
In order to maintain optimum control and stability for your vehicle, you should use identical tires with the same tread pattern, size, and construction. Generally speaking, you should not use a mixed or mismatched set of tires on your vehicle unless the tire and/or vehicle manufacturer specifies that it is acceptable to do so.
Examples of mismatched tires include mixing winter and all-season or summer tires, tires with different tread patterns, tires from different manufacturers, run-flat tires with non-run-flat tires, and tires with different construction characteristics or sizes. The only exception to this would be if your vehicle has a staggered fitment with different sized tires on the front and rear axles of the vehicle.
In addition to maintaining optimum control and stability, having a uniform set of tires allows you to regularly rotate them. This will enable you to have even tire wear, thus extending their life and maximizing your investment in your tires.
Although it is ideal to have your tires wear evenly throughout their lives, it is not always possible, even with regular rotations. Tires can wear unevenly if your vehicle has staggered fitments on the front and back, if your vehicle has an alignment or other mechanical problem, if your vehicle is insufficiently maintained, or due to driving conditions. You may also lose an individual tire due to puncture or other irreparable damage. In either case, you may be forced to consider purchasing one or more tires to replace the worn and/or damaged tire(s), or having to buy a complete set and forfeiting the remaining life on the non-damaged tires.
Obviously, it is best to replace all the tires at the same time because it will restore the handling and traction to optimum levels. However, due to financial reasons, this is not always possible. On the other hand, the less-expensive alternative of replacing two of the tires requires choosing exact, equivalent, or alternative tires.
If you decide to replace just two of the tires, the best choice is to replace them with the exact same brand, style, and size as the tires already on the vehicle. This is wise because the tire's physical dimensions, internal construction, materials, and tread design will be nearly identical to the tires you are replacing. If it is not possible to purchase the exact same tires as those currently needing to be replaced (for example, the tire is no longer available), then the next best option is to choose tires in the same performance category with equivalent load rating, speed rating, handling, and traction characteristics as the original tires. The final option of choosing alternative tires that do not match any of the characteristics of your original tires should only be used as a last resort or in an emergency situation. This is because the use of tires with different performance characteristics, load ratings, speed ratings, or sizes can cause the vehicle's handling to become unbalanced, especially in adverse weather conditions.
In summary, always try to maintain an even set of tires that are identical in brand, model or style, size, tread pattern, and tread depth. Anything else will compromise your vehicle's comfort, handling, and safety characteristics.
Your Tire's Contact Patch
A tire's contact patch is the area of the tire that comes in contact with the ground, much like a footprint. Believe it or not, most tires have a fairly small contact patch- a little larger than the size of your hand. As a result, not much of the tire's surface area is touching the ground, so the amount that does touch the ground must handle a lot of weight and force.
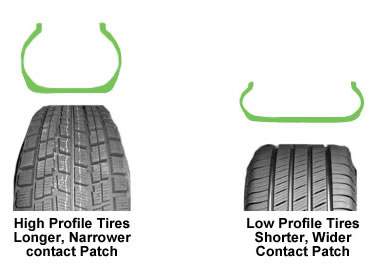
The contact patch will vary in shape and size depending on the geometry of the tire, and this affects various performance characteristics of the tire. Tires with a higher profile or aspect ratio (that is, the height of the sidewall is fairly large compared to the section width of the tire), tend to have a long and narrow contact patch. Typically, these would be passenger cars and light truck tires. The longer, narrower contact patch gives these tires a smooth ride and allows them to handle in a predictable manner. They may also have especially good traction in snowy conditions.
Conversely, most high-performance and ultra-high performance tires have a lower profile (lower aspect ratio). As a result, the contact patch is generally shorter and wider, which makes them very effective in cornering stability and traction. This also allows the high-performance and ultra-high performance vehicles to have very responsive handling, especially on dry roads.
Tires and Cornering
SIMPLE PHYSICS
To fully understand what the wheels and tires go through when driving, you must learn about the principles of your vehicle’s suspension. When cornering, several forces you learned in physics class act on the vehicle as it turns and changes direction, which in turn, puts the tires under excessive stress and force. Below is a list of concepts you should be aware of that your vehicle goes through during a turn.
CENTRIFUGAL AND CENTRIPETAL FORCES
The centrifugal force pulls your vehicle toward the outside of the turn. This requires that an opposing and equal force counter it to ensure you corner safely and correctly. That opposing force is generated by the gripping power of the tires, which is known as cornering force.
CORNERING FORCE
This is the frictional force generated by the cornering tires. It counters the centrifugal force listed above. The tire force is generated by tire slip, and when it comes to cornering, the slip angle is proportional to the tire force.
SLIP ANGLE
Slip angle is the deformation of the tire contact patch; the deflection of the patch deforms the tire. It is measured in how much the patch has been distorted in relation to the wheel during cornering. The cornering force increases in proportion to the occurrence and leads to the increase in the slip angle. Under normal driving conditions, you’ll find that the slip angle ranges from approximately 2 to 5 degrees with a maximum of 10 degrees.
SELF-ALIGNING TORQUE
This is the torque that occurs at the contact patch of the tires due to the friction involved in cornering. This will provide a major impact on the tire contact patch.
CORNERING POWER
This is the rate at which the cornering force increases as the slip angle increases. This is what determines driver handling, the higher cornering power, the higher cornering ability and stability of the vehicle.
TIRE AND CORNING FORCE/POWER
There are three key things to remember in terms of corning that apply across the board no matter the vehicle or the tire being used. First, remember that wet Surfaces decrease the friction which reduces the overall cornering force. Second, as the load increases, the cornering force also increases. You will experience a gradual decline in force should the load exceed the recommended value for the tire. Finally, tire stiffness increases the cornering power. This is seen with “low profile” tire applications. The lower the profile the stiffer the sidewall can be, resulting in cornering power.
STEERING CHARACTERISTICS
Steering is the key element which guides your vehicle through turns. Its characteristics depend on the load distribution on the front and rear axles, as well as the cornering power of the tires. Here are the three biggest characteristics.
Oversteer
This occurs during a turn and the rear tires lose traction. This leads to the rear of the vehicle to head towards the outside corner. Rear-wheel-drive vehicles are most prone to oversteer, especially through tight cornering.
Understeer
Understeer is a condition in which the circular path of the vehicle’s motion is of a larger diameter than what is indicated by the direction the wheels are pointing.
Neutral Steer
This is a cornering condition that the front and rear slip angles are the same. Though it seems as an ideal state of balance, this is not as stable as slight Understeer.


